Thursday, October 14, 2010
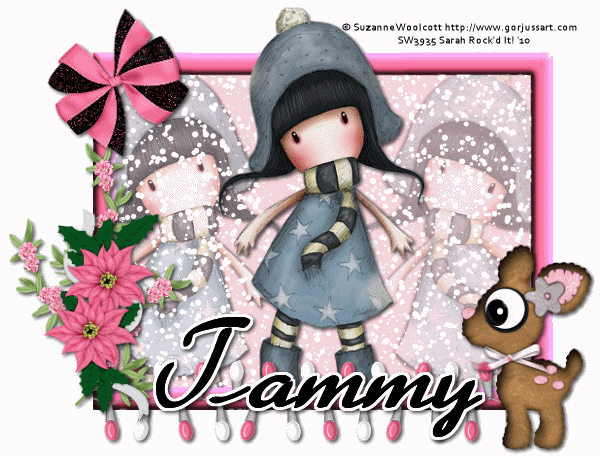
Gorjuss Snow Princess.
I know it's only October but I love the snow!! When i lived in Montana, we got our first snow October 5th last year..lOl..I must say, I miss it!! SoOo I did this tut with a fabulous kit from Tammy's Scraps.
Thanks so much Tammy! This kit is awesome!!
Please keep in mind this is my FIRST tut with animation!
If you have any questions, please don't hesitate to Email me!
For this tutorial, you’ll need a working knowledge of PSP.
I’m using PSP 9 but any version should work.
This tutorial is my own and any resemblance to any other is purely coincidental.
Supplies for this tutorial:
PSP (any version)
Scrap kit of choice.
I’m using the PTU kit: Snow Princess
You can get her kits here: http://www.scrappetizing.com/store/
Be sure to check out her blog: http://tammysscraps.blogspot.com/
Tube of choice: By Suzanne Woolcott
You MUST have a license to use her work. Don’t use her tubes without a license!
You can find them here: http://gorjussart.com/store
Plug-in VanDerLee Snowflakes: http://www.vanderlee.com/plugins_snowflakes_download.html
Let’s begin!
Open a new canvas: 800x800 (you can crop and resize later)
Use your rectangle tool-Foreground -your color of choice, background- null.
Draw out a rectangle with the width set at 23. Convert this rectangle to raster level.
Effects>3D effects>Inner bevel with these settings:
Smoothness:30 Angle:45
Depth:6 Intensity:50
Ambience:31 Elevation:30
Shininess:19
Using your magic wand, click INSIDE the rectangle.
Selections>Modify>Expand by 3
Add new layer
Select a paper from your kit. I used paper 15
Edit>Copy
Go back to the layer you just added-Edit>Paste INTO selection.
Move paper layer UNDER your rectangle layer.
Deselect & add drop shadow of your choice to your rectangle layer.
Select the Christmas lights from your kit. Resize ( I used my raster deform tool)
And place on the bottom of your frame.-Add your drop shadow.
Select a bow from your kit-Paste into your canvas and resize to your liking
& place in the upper left corner of your frame. Add drop shadow
Select princess flower3 from your kit. Copy & paste into your canvas.
Resize and move to the left side of your frame. Add drop shadow
Select princess flower2 from the kit. Copy & paste into your canvas.
Resize and place on top of your first set of flowers-Add your drop shadow.
Copy and paste element Rudolf1 into your canvas.
Resize and move to the lower right hand corner or your frame.
Add your drop shadow.
Select your tube/Copy. Click on your paper layer.
Edit>Paste as new layer.
Add drop shadow to your tube layer.
Select your frame layer>Duplicate--Move this duplicated layer UNDER your tube layer.
Go back to your original frame layer and erase any parts of the frame covering your tube.
Now duplicate your tube layer & move it under your original tube layer.
Move it to the left--Parts of it may hang out of the sides and bottom but that’s ok
Delete anything hanging out.
Now duplicate this layer. Change the blend mode to screen. Merge down.
And change the opacity to 65.
Duplicate this layer>Image>Mirror
Adjust the position of the tube if needed.
--Now--
Merge your two copies of your tube down then merge this layer with your tubes down.
Then merge this layer down . (Your copied tubes & the original frame & paper should all be one layer now.
Make this layer inactive (Click on the little eye)
Add your copyright & any name/text you want on it.
Merge VISIBLE.
This is the time you need to crop your tag. & resize to where you want it when it’s finished.
We’re going to animate!
Select your bottom layer>Select All>Float>defloat
Kepp selected!! Add new raster layer
Using your VanDerLee Snowflakes plug-in use Hardness 130 & the rest as the default settings
Delete any snow on your frame.
Select none.
Merge all-Copy-Paste into Animation shop
Go back to PSP-Undo until there are no snowflakes on your tag
Do the same steps two more times, except hit your random seed a couple of times on your snowflakes
Paste each of your new frames into animation shop-AFTER current frame.
Change your animation settings to 18
Save as .GIF and you’re done.
Hope you got all of that..LOL..I’m still new & this is my first animated tut.
Any questions, feel free to email me!
Subscribe to:
Post Comments
(
Atom
)


0 comments :
Post a Comment