Monday, May 28, 2012
Tag w/ my template!

Crabby babe-FTU

For this tutorial, you’ll need a working knowledge of PSP.
I’m using PSP X4 but any version should work.
This tutorial is my own and any resemblance to any other is purely coincidental.
Supplies for this tutorial:
PSP (any version)
Scrap kit of choice.
I’m using the FTU kit: Paradise
You can get the kit: HERE
Tube by Ismael Rac.
You *MUST* have a license to use this tube!
Find them here: www.xeracx.net/store
Crab animation: HERE
Animation shop
::Let’s begin::
Open new canvas 800*600
Copy and paste frame of choice from the kit
Resize if you need to
Select the inside of the frame with your magic and
Selections
Modify
Expand by 3
Copy and paste a paper from the kit
Selections
Invert delete
Select none
Move paper below frame
Now open up any elements you want to include in your tag
Copy
Paste
Resize
And position
Add drop shadow to each one.
I used the following:
Sun
Lighthouse
Pelican
Water
Sand bucket
Copy and paste your tube now
Add drop shadow
Crop your tag down
Resize
Add your © info
Add your name
Merge all
Copy
Paste in animation shop
::in AS::
Open your crab animation
Resize if you need to
See how many frames it has
Duplicate your tag you made in PSP to as many frames as in the animation
One you’ve done that, select all your frames of your tag
Go to your crab
Select all frames
Copy
Back to your tag
Right click in the first frame
Paste> into selected frames
Click
Now select all frames again
Copy
Paste AS NEW ANIMATION
Select all
Animation>Reverse frames
Copy all frames.
Back to your first tag w/ the crab animation already in it
Go to your LAST frame of that tag
Right click
Paste>AFTER CURRENT FRAME
View animation
If you’re happy w/ it, save and enjoy your new tag.
Ftu tut w/ my kit!
A good tagger firned of mine has used my part of the glamorous collab to create this awesome tut!
Check out her blog HERE to see the tut!
Thanks so much Sherena!!

Friday, May 18, 2012
Sweet Pink

For this tutorial, you’ll need a working knowledge of PSP.
I’m using PSP X4 but any version should work.
This tutorial is my own and any resemblance to any other is purely coincidental.
Supplies for this tutorial:
PSP (any version)
Scrap kit of choice.
I’m using the PTU kit: Sweet Caroline
You can get her kits here: www.sweetcravingsscraps.blogspot.com
Tube by Keith Garvey.
You *MUST* have a license to use this tube!
Find them here: www.psptubesemporium.com
Template (Voices have taken over) by Fairy gem & Kandi
Here: HERE
::Let’s begin::
Open the template
Delete © info
Delete all text
Delete the arrows
Fill each part of the template w/ papers from the kit.
Select your shape you want to fill w/ your magic wand
Selections
Modify
Expand 2
Copy and paste your paper as new layer
Selections
Invert
Delete
Select none
Follow those same steps to fill each part of the template
Copy parts of your tube (head/face & chest is what I used)
And paste in the small frames over your paper
Erase anything hanging beyond the frames
Change the blend mode to luminance legacy.
(you may want to change up your blend mode depending on your tube & the colors)
Copy and paste any of the elements you want to include in your tag.
I used the following:
Purple butterfly
Leaves
Fence
Little owl
Pink flower bush
Pink flowers
Copy
Paste
Resize
Position
Add drop shadow to each element you add.
Copy and paste your tube
Add drop shadow
Crop down with the selection tool
Resize if you need to
Add your © info.
Add your name & text.
Save and enjoy!
Monday, May 14, 2012
Ftu banner show off
Summer Babe-FTU

For this tutorial, you’ll need a working knowledge of PSP.
I’m using PSP X4 but any version should work.
This tutorial is my own and any resemblance to any other is purely coincidental.
Supplies for this tutorial:
PSP (any version)
Scrap kit of choice.
I’m using the FTU kit: Summer Collab (By AMY)
You can get her kits here: HERE
Tube by Ismael Rac
You *MUST* have a license to use this tube!
Find them here: www.xeracx.net/store
::Let’s begin::
Open a new image 800x600
Copy and paste a frame from the kit
Select inside the frame w/ your magic wand
Selections
Modify
Expand by 3
Copy and paste paper of choice as new layer
Selections
Invert
Delete
Select none
Move below frame
Copy and paste the pink/yellow/& orange dots
Resize if needed
Move below the frame
Position to the right
Duplicate
Mirror
Merge the dot layers together.
Copy and paste your tube.
Add drop shadow
Duplicate your frame and move over top of your tube
Erase any art of the frame covering her face or hair
Now erase any part of your tube hanging below the frame.
Copy the close-up of your tube
Paste as new layer over your paper layer
Erase anything hanging beyond your frame.
Change blend mode to luminance legacy.
Add drop shadow to your bottom frame layer
Make your top frame layer active
This is where you add the rest of the elements you want to use.
I used the following:
Fish balloon (x2)
Leaves
Flower of choice.
Crab
Sparkles
Sand
Copy
Paste
Position
Add drop shadows to each element you add.
Crop your tag down
Add ©
Add your name & text.
Save and enjoy your new tag.
Sunday, May 13, 2012
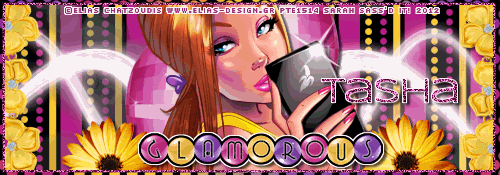
FTU Glamorous Collab!!
Some great friends got together to bring you these awesome kits!!
Be sure to check out each blog and get each part of our collab!!
Here is my part
((there's LOTS more inside than you see in the preview!)):

Click to download
Check out the other parts here:
Be sure to leave lots of love when downloading these freebie kits!!
Saturday, May 12, 2012
RAC Tag

Bee Happy-PTU

For this tutorial, you’ll need a working knowledge of PSP.
I’m using PSP X4 but any version should work.
This tutorial is my own and any resemblance to any other is purely coincidental.
Supplies for this tutorial:
PSP (any version)
Scrap kit of choice.
I’m using the PTU kit: ‘Don’t worry Bee happy’
You can get her kits here: HERE
Tube by TOOSHTOOSH
You *MUST* have a license to use this tube!
Find them here: www.tooshtoosh.com
Template “Erotic” by Kandi here: HERE
::Let’s begin::
Open your template
Delete the ©
Delete word art
Delete stars
Select a part of the template w/ your magic wand
Select all
Float
Defloat
Selections
Modify
Expand by 2
Paste paper as new layer
Selections
Invert
Elete
Select none.
Repeat those steps on each part of the template until it’s filled w/ papers or colors from the kit.
Add drop shadow to each part of the template
Change the color of the dots to match the rest of the colors in your tag.
Now resize
Copy
Paste
& position all the elements you want to use in your tag.
Add drop shadow to each one you add.
I used the following:
Bee
Sunflower (x2)
Candle jar
Yellow bubbles
Leaves (x4)
Bee beads (x2)
Once you have everything placed, copy and paste your tube over all other layers.
Add drop shadow.
Crop your tag down
Resize if you need too.
Add your ©
Add name/text
Save and enjoy!

Monday, May 7, 2012
-Weekend Babe-PTU


For this tutorial, you’ll need a working knowledge of PSP.
I’m using PSP X4 but any version should work.
This tutorial is my own and any resemblance to any other is purely coincidental.
Supplies for this tutorial:
PSP (any version)
Scrap kit of choice.
I’m using the PTU kit: Lookout Weekend
You can get her kits here: HERE
Tube by Zlata Ma
You *MUST* have a license to use this tube!
Find them here: www.picsfordesign.com
Plugin: VM Natural Sparakle
::Let’s begin::
Open new canvas 500*175
Copy and paste paper of choice as new layer
Copy and paste the close up of the tube,
Duplicate
Mirror
Position
Merge the two close up layers together
Change blend mode to luminance legacy
Copy and paste the round frame 1
Move over to one of the edges of your canvas
Duplicate
Mirror
Add drop shadow to each frame
Now you copy and paste all the other elements you want to use
I used the following:
Skateboard
-tilt
-duplicate
-mirror
-drop shadow to both
Pink mesh
-duplicate
-mirror
Pink shoe
-duplicate
-mirror
-add drop shadow to both
Copy and paste your over all other layers
Add drop shadow
Apply your VM Natural Sparkles here.
I just used a random setting.
Add new raster layer
Select all
Selections
Modify
Selections borders
Width 2
flood fill w/ color of choice
Select none
Add noise
If you want an inner outline (white) do the same steps w/ the selection borders but don’t add the noise.
Add your © info
Name
And save!
Avatar:
150*150 canvas
Copy & paste a paper
Copy and paste your tube
Position
Drop shadow
Ad any elements you want
Add the border just like we did with the banner.
Add your © and your name.
Save and enjoy!
-Emo Fairy Showoff-
I made this set using a new kit from
Angel's Designz
called Emo Fairy.
It's a great kit!!! Thanks Kelly!!


Friday, May 4, 2012
-Happy Trails Partner-FTU

For this tutorial, you’ll need a working knowledge of PSP.
I’m using PSP X4 but any version should work.
This tutorial is my own and any resemblance to any other is purely coincidental.
Supplies for this tutorial:
PSP (any version)
Scrap kit of choice.
I’m using the FTU kit: Happy Trails (blogtrain)
You can get her kits here: www.sweetcravingsscraps.blogspot.com
Tube by Ismael Rac.
You *MUST* have a license to use this tube!
Find them here: www.xeracx.net/store
::Let’s begin::
Open new canvas 500*175
Copy and paste paper of choice as new layer
Copy and paste the desert overlook element
Add drop shadow
Copy and paste any other elements you want to use in your banner.
I used the following:
Fence
-Resize
-Duplicate
-Mirror
-drop shadow
Covered wagon
-resize
-drop shadow
Cactus
-resize
-drop shadow
Horse
-Resize
-drop shadow
Grass
-resize
-position
-duplicate
-mirror
-merge the two together
-drop shadow
Copy and paste your tube
Position
Drop shadow
Add any wording you want
Add your ©
Add your name
Merge visible
To make your outline:
Select all
Selections
Modify
Selection borders
•both sides
•anti-alias checked
•border width-2
Hit ok
flood fill w/ color of choice
Select none
Add noise setting of choice.
Use your magic wand
Select inside your frame
Add new raster layer
Do the “selection borders” again
Same settings except make border width 1
Ok
Select none
Move below your first border
Merge visible
Save!
Subscribe to:
Posts
(
Atom
)


