Wednesday, September 28, 2011
-Witchy Template-
Love RAC's new Witch tubes so I made a template to match.
Here it is. Click to download:

If you DL please leave some ♥♥♥♥
Monday, September 26, 2011
-Spooky Sweet-PTU

Sunday, September 25, 2011
-Here Kitty Kitty-PTU

-click for clear view-
For this tutorial, you’ll need a working knowledge of PSP.
I’m using PSP 9 but any version should work.
This tutorial is my own and any resemblance to any other is purely coincidental.
Supplies for this tutorial:
PSP (any version)
Scrap kit of choice.
I’m using the PTU kit: Copy Cats2 by Angel’s Designz.
You can get her kits here: http://angelsdesignz.blogspot.com/
Tube of choice: I’m using Elias Chatzoudis
This is a tube you MUST have a license to use. Don’t use these tubes without a license!
You can find these tubes here: www.psptubesemporium.com
Template 44 here: HERE
Open your template
Delete the © layer
Select the rectangles w/ your magic wand
Copy a paper from your kit
Paste as new layers
Selections
Invert
Delete
Select none
Select the little squares w/ your magic wand
Copy a paper from your kit
Paste as new layer
Selections
Invert
Delete
Select none
Now copy & paste your tube as new layer
Add drop shadow.
Copy & paste the elements you want to use from the kit
Resize and place how you like in your tag.
Make it your own!
I used the following:
Fish bone
Knot ribbon
Milk bottle
Pink paw print
Splatter
Sparkles1
Add drop shadow to each element you add.
Crop down
Resize
Add name & © info.
Save & enjoy your new tag.
Monday, September 19, 2011
-Butterfly Bliss-PTU Tag
I made this tag w/ a very pretty kit by Vicki called
Butterfly dreams.
You must check it out! It's very pretty!!
Thanks Vicki!
here's the tag I made w/ it:

Sunday, September 18, 2011
-Autumn Medley-PTU
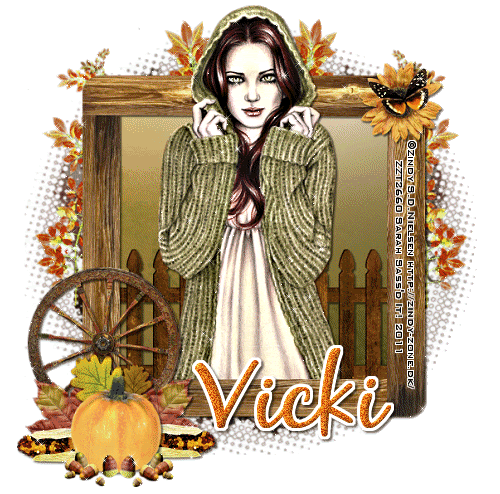
(Click tag for clear view of ©)
For this tutorial, you’ll need a working knowledge of PSP.
I’m using PSP 9 but any version should work.
This tutorial is my own and any resemblance to any other is purely coincidental.
Supplies for this tutorial:
PSP (any version)
Scrap kit of choice.
I’m using the PTU kit: Autumn Medley
You can find it here: www.pinkprincessscraps.blogspot.com
Tube/Image-I used this beauty from Zindy
You MUST have a license to use these tubes! Do NOT use w/o a license!
Find them here: HERE
Mask 56 here: http://babspsp.blogspot.com/
Filters: Alien Skin Xenofex2 constellation
Open new image 800*600
Copy the wooden frame
Resize by 65%
Copy
Paste as new layer in your canvas
Select the inside of your frame w/ your magic wand
Selections
Modify
Expand by 4
Copy a paper
Paste as new layer
Selections
Invert
Delete
Select none
Move below your frame
Copy the fence element
Paste as new layer
Move below frame
Erase any that’s hanging out beyond the frame
Now select any of the other elements you want to use in your tag.
Remember, you can make this your own!
I used the following:
The different leaves
Branches of leaves
Wheel
Pumpkin
Acorns
Corn
Butterfly
Sunflower
Place each element as desired on your tag
Add drop shadow of choice to each one.
Copy another paper from your kit
Paste as new layer under all other layers
Apply your mask
Merge visible
Crop down and resize
Add your name
© info
Save if you’re not going to animate
TO ANIMATE
Make sure you have a white background under your merged image!
I used the following settings on my merged image
Star size: 1.98
Variation: 50
Edge: 3
Overall: 0
Overdrive: 100
Twinkle: 100
Copy merged
Paste as new animation in AS
Back to PSP
Undo your constellation effect
Apply again but hit random seed
Copy merged
Back to AS
Paste after current frame
Back to PSP
Undo
Apply constellation again hitting random seed again
Copy merged
Back to AS
Paste after current frame
Highlight all 3 frames
Change speed to 15
Save & enjoy your new tag!
Wednesday, September 14, 2011
-Spook You-FTU

For this tutorial, you’ll need a working knowledge of PSP.
I’m using PSP 9 but any version should work.
This tutorial is my own and any resemblance to any other is purely coincidental.
Supplies for this tutorial:
PSP (any version)
Scrap kit of choice.
I’m using the FTU kit: Ookie Spooky by Kittz
You can get her kits here: HERE
Tube of choice: I’m using TooshToosh
This is a tube you MUST have a license to use. Don’t use these tubes without a license!
You can find these tubes here: www.tooshtoosh.com
Template 107 here: http://tagtemplatesandmore.blogspot.com/
Let's begin!
Open your template
Delete the © layer
Delete the other layers you don’t want to use
Select one of your background rectangles w/ your magic wand
Selections
Modify
Expand by 1
Copy a paper from the kit
Paste as new layer
Selections
Invert
Delete
Select none
Add drop shadow
Do the same for the rest of your shapes in your template.
Fill each w/ either paper from your kit or a color to match it.
Select the elements you want to use in your tag
Resize if needed
-Ookie tree
-Ghost
-purple bat
-spider web
-Garland
-Cauldron
*REMEMBER*
You can make this tag your own!! Change it up a bit if you want!
Copy each element and add it to your tag.
I duplicated and mirrored some of my elements
Add drop shadow to each element you add
Now we add our tube
Add drop shadow
Crop down using our rectangle selection tool
Add your name/text
Add your © info
Save & enjoy your new tag!
Tuesday, September 13, 2011
-Spooks 4 Treats-PTU

For this tutorial, you’ll need a working knowledge of PSP.
I’m using PSP 9 but any version should work.
This tutorial is my own and any resemblance to any other is purely coincidental.
Supplies for this tutorial:
PSP (any version)
Scrap kit of choice.
I’m using the PTU kit: Spooks for treats by Angel’s Designz.
You can get her kits here: http://angelsdesignz.blogspot.com/
Tube of choice: I’m using Elias Chatzoudis
This is a tube you MUST have a license to use. Don’t use these tubes without a license!
You can find these tubes here: www.psptubesemporium.com
Template37 here: http://paradisepspdesigns.blogspot.com
Open your template
Delete the © layer
Delete the dotted circle
Select one of your background rectangles w/ your magic wand
Selections
Modify
Expand by 1
Copy a paper from the kit
Paste as new layer
Selections
Invert
Delete
Select none
Add drop shadow
Do the same for the rest of your shapes in your template.
Fill each w/ either paper from your kit or a color to match it.
Select the elements you want to use in your tag
Resize if needed
I used the following:
Fencing
Spider web
Bat
candy corn sucker
Sparkles
Lights
Cupcake
Couldron
Jack-o-lantern
Haunted houses
Purple and black doodle
*REMEMBER*
You can make this tag your own!! Change it up a bit if you want!
Add drop shadow to each element you add
Now we add our tube
Add drop shadow
Crop down using our rectangle selection tool
Add your name/text
Add your © info
Save & enjoy your new tag!
Monday, September 12, 2011
-Falling for Fall-PTU

For this tutorial, you’ll need a working knowledge of PSP.
I’m using PSP 9 but any version should work.
This tutorial is my own and any resemblance to any other is purely coincidental.
Supplies for this tutorial:
PSP (any version)
Scrap kit of choice.
I’m using the PTU kit: Falling for Fall
Be sure to check out her blog: www.candyliciousdesignz.blogspot.com
Tube of choice: Gorjuss girl by Suzanne Woolcott
You *must* have a license to use these tubes.
Find them here: HERE
Template: You can find it here on my blog. (Waiting for Fall)
Let’s begin:
Open the template
Remove my © layer & the text layers
Select a part of the template you want to work w/ first
Selections-select all
Float
Defloat
Copy a paper from the kit
Paste as new layer
Selections
Invert
Delete
Select none
Do the same for the other parts of the template you want to add a paper to.
To the center circle, I took the sunflower & duplicated it to go all the way around the circle.
I did the same thing w/ the little bow & place my bow layers UNDER my flower layers.
Select the rest of the elements you want to include in your tag.
You will have to resize them according to your tag size.
Add them to your tag, placing them where you like.
I used the following:
Tree (resized, duplicated, & moved below all other layers so you can only see the leaves in the background)
Corn
Owl
Pinecone
Leafy vine
Place each element throughout your tag as desired.
Make the tag your own by adding your own twist!
Add drop shadow to each element.
Place your tube in the center
Crop if needed
Add drop shadow
Use your selection tool to crop your tag down
Resize
Add name/text
Add your © info
Save & enjoy your new tag!
Sunday, September 11, 2011
-Kawaii Cutee-PTU

For this tutorial, you’ll need a working knowledge of PSP.
I’m using PSP 9 but any version should work.
This tutorial is my own and any resemblance to any other is purely coincidental.
Supplies for this tutorial:
PSP (any version)
Scrap kit of choice.
I’m using the PTU kit: Kawaii Cutie
You can find it here: www.pinkprincessscraps.blogspot.com
Template 50 by Leah here: HERE
Tube/Image-Included in the kit
Mask of choice
This is going to be super easy!
Let’s begin!!
Open your template
Delete the © layer
Delete the text in your template
Select each part of your template (individually) w/ your magic wand
Copy a paper from your kit
Paste as new layer
Selections
Invert
Delete
Select none
Do this for each shape in your template.
Select the outlines of your shapes
Add noise setting of choice to them to make them glittery
Now we start adding our elements
Select the elements you want to use
Resize them if you need to
Copy & place throughout your tag-to your liking.
Remember, you can make this tag your own!!
I used the following elements:
Kawaii girl
Cupcake
Ice cream cone
Flower
Rainbow
Pink ribbon
Musical notes
Sparkles
flags
Add drop shadow setting of choice to each element you add,
This gives your tag depth.
Select another paper from your kit
Copy & paste it below all other layers
Apply your mask to this layer.
Adjust to your liking
Merge group
Now crop your tag down using your rectangular selection tool
Add your © info & your name/text
Save and enjoy!
Thanks for checking out my tut!
Thursday, September 8, 2011
-Free!- PTU Tag
I made this tag w/ Vicki's awesome 'Trendsetter' kit.
Awesome kit! Thanks so much Vivki!!
Find her awesome kits HERE

Wednesday, September 7, 2011
-Spooky Cutie-FTU Scrap Kit
I have a new FTU kit for you to play with.
Hope you can create something wonderful with it!
If you do, i would love to see what you make!!
Here's the PV:

Monday, September 5, 2011
-Happy Halloweenie!!-PTU

-Click tag to view clear © info-
For this tutorial, you’ll need a working knowledge of PSP.
I’m using PSP 9 but any version should work.
This tutorial is my own and any resemblance to any other is purely coincidental.
Supplies for this tutorial:
PSP (any version)
Scrap kit of choice.
I’m using the PTU kit: Halloweenie
You can find it here: HERE
Template by Deb here: HERE
Tube: I’m using the awesome art of : Elias Chatzoudis
You *MUST* have a license to use these tubes! Do NOT use them w/o a proper license!
You can find these tubes here: www.psptubesemporium.com
Let’s begin!!
Open your template
Delete the © layer
Delete the text in your template
Select your main rectangle in the background w/ your magic wand.
Selections
Modify
Expand by 1
Select the first paper you want to use from your kit
Copy it
Paste as new layer
Selections
Invert
Delete
Select none
Select the little white squares and flood fill each w/ a color to match your kit and tube.
Apply the weave texture to each of these square using these settings:
Gap size:1
Width:8
Opacity:1
Weave & Gap color: white
Fill gaps checked.
-ok-
Copy and paste your tube
Crop so that she fits inside the circle
Now select the elements you want to use in your tag.
Open each and resize as you need to
Copy then and paste in your tag the way you like.
Remember, you can make this tag your own!!
I used the following elements:
Bow
Flower
Fencing
Keep out sign
Cat
Jack-o-lantern
Sparkles
Spider web
Add a drop shadow to each layer to give your tag depth.
Crop down
Resize if you need to
Add your © info and your name/text
Save & enjoy your new tag!
Thanks for doing my tut.
I also made this tag using the same kit.
Thanks Vicki for the fab kit!!

Subscribe to:
Posts
(
Atom
)


