Saturday, December 24, 2011
Tag show Offs


Friday, December 23, 2011
Christmas Candy-PTU tag

Thursday, December 22, 2011
-Emo Christmas-PTU Tag

Thursday, December 15, 2011
Template Links
Soo..I've lost 7 of my 9 FTU kits :( Can't get those back.
BUT I was able to save all of my templates!!
You can now download all of my templates to this point
HERE.
I should have some new kits coming soon!
Wednesday, December 14, 2011
-New Year-PTU

For this tutorial, you’ll need a working knowledge of PSP.
I’m using PSP 9 but any version should work.
This tutorial is my own and any resemblance to any other is purely coincidental.
Supplies for this tutorial:
PSP (any version)
Scrap kit of choice.
I’m using the PTU kit: Happy New Year
You can find it here: www.eclipsecreations.blogspot.com
Tube/Image-Ismael Rac. You MUST have a license to use this tube. Do NOT use this tube w/o the proper license!
Get these tubes here: www.xeracx.net/store
This is going to be super easy!
Let’s begin!!
Open new image 800*600
Open your circle frame
Copy & paste as new layer
Select inside your frame w/ your magic wand
Selections
Modify
Expand by 4
Copy and paste a paper from your kit
Selections
Invert
Delete
Select none
Move below your frame
Copy and paste your tube over your frame
Select your frame layer
Duplicate
Move over your tube.
Erase parts that are covering your tube
Add drop shadow to your tube and bottom frame layers
Now select the elements of your choice to use in your tag
I used:
Snowflake dangles
Star scatter
Sparkles
Clock
Two hats
Champaign and glasses
Stars
Make it your own and use the elements you want.
Merge visible
Crop
Resize
Add your © and name
Save & enjoy!
-PTU Tag-Santa Cutie-
I joined the CT for the Ismal RAC store today!!
OMGawsh!! So beyond EXCITED!!!!!
Here's my first tag as part of the store CT!!
I used the fabulous Happy X-Mas HD Pack
Be sure you have the proper license to use these tubes & kits!!
You can find them all HERE
I also used a great Christmas template from an awesome designer friend over at
Thanks Leah for the fab templates!!
Here's the tag I made:

Tuesday, December 13, 2011
-Santa Express-PTU

For this tutorial, you’ll need a working knowledge of PSP.
I’m using PSP 9 but any version should work.
This tutorial is my own and any resemblance to any other is purely coincidental.
Supplies for this tutorial:
PSP (any version)
Scrap kit of choice.
I’m using the PTU Kit: Santa Express by Angel’s Designz.
You can get her kits here: http://angelsdesignz.blogspot.com/
Tube of choice: I’m using the wonderful work of Elias Chaztoudis
This is a tube you MUST have a license to use. Don’t use these tubes without a license!
Find it here: www.psptubesemporium.com
Template (w/ candy canes on it) by Melissa here: HERE
Let’s Begin:
Open your template
Delete the © info
Delete your candy canes as well (unless you want to use them)
Select each shape in your template and fill w/ a paper or color of your choice.
Do this by:
Select your shape
Select all
Float
Defloat
Copy and paste paper
Selections
Invert
Delete
Select none
Do this for each of your sections of your template
Now add your tube
Add drop shadow of choice
Add your elements
I used the following:
-Hanging balls
Mistletoe
Present1
Present 2
Teddy bear
Stocking
Snowflake doodle
snow globe
&& any other elements you want to include.
Change it up! Make it your own!
Add © info and any names or text
Save & enjoy your new tag!
MERRY CHRISTMAS
Wednesday, December 7, 2011
-Have yourself a Merry lil Christmas-PTU
I made this tag using Kelly adorable new kit
"FROST BERRY"
This kit is wayyyyy cute!!!
Check it out HERE, along w/ her other awesome kits!
Thanks Kelly!!

Sunday, December 4, 2011
-Naughty Christmas-
I made this tag w/ a fab kit from Yolanda over at Eclipse Creations.
She has some great kits & fab freebies!
For this tag I used her 'Naughty X-Mas' kit.
Check her out HERE
Thanks so much Yolanda!
Here's the tag I made:

Wednesday, November 30, 2011
-Sweet Christmas-PTU

((Click for better view))
For this tutorial, you’ll need a working knowledge of PSP.
I’m using PSP 9 but any version should work.
This tutorial is my own and any resemblance to any other is purely coincidental.
Supplies for this tutorial:
PSP (any version)
Scrap kit of choice.
I’m using the PTU kit: Sweet Christmas
You can find it here: HERE
Template 119 by Leah here: www.amyleahsgimptastictuts.blogspot.com
Tube/Image-By Lady Mishka. You MUST have a license to use this tube. Do NOT use this tube w/o the proper license!
Get these tubes here: www.picsfordesign.com
Mask of choice
This is going to be super easy!
Let’s begin!!
Open your template
Delete the © layer
Delete the text in your template
Select each part of your template (individually) w/ your magic wand
Copy a paper from your kit
Paste as new layer
Selections
Invert
Delete
Select none
Do this for each shape in your template.
Fill each with either a template or color to match your kit/tube.
Now select all the elements you want to use in your tag
Open them up
Resize as you prefer.
Copy and paste each into your tag as a new layer
Position
Add drop shadow
I used the following elements:
Ribbon
Pink candy canes
Pink baubles
Blue baubles
Pink garland
Christmas lights
Copy and paste your tube
Crop as needed
Add drop shadow
Copy a paper from your kit
Paste as new layer below all other layers
Apply your mask to this layer
Merge group
Crop your tag down
Add your © info and any text you want on it.
Save and enjoy your new tag!
Friday, November 25, 2011
-Pink Cutie-PTU

(Click for clear view)
For this tutorial, you’ll need a working knowledge of PSP.
I’m using PSP 9 but any version should work.
This tutorial is my own and any resemblance to any other is purely coincidental.
Supplies for this tutorial:
PSP (any version)
Scrap kit of choice.
I’m using the PTU kit: Luv 2 Text
You can find it here: www.pinkprincessscraps.blogspot.com
Tube is by Zlata_M you can find these tubes at www.picsfordesign.com
You MUST have a license to use this tube! Don’t use w/o a license!
Mask of choice
This is going to be super easy!
Let’s begin!!
Copy & paste a paper from your kit
Paste as new layer
Apply your mask to this layer
Merge group
Open a frame from your kit
Select the inside w/ your magic wand
Selections
Modify
Expand by 4
Add new raster layer
Flood fill w/ a color to match your kit and tube.
Select none
Move below your frame
Copy & paste the close up of your tube
Adjust and crop so it fits inside your frame
Change blend mode to luminance legacy
Duplicate
Mirror
Now copy & paste the elements of your choice.
Make this tag your own.
I used the following:
Element 40
Element 62
Element 7
Element 43
Element 18
& sparkles from the kit
Copy & paste each element you want to use
Copy & paste your tube
Add drop shadow
Crop your tag down
Resize
Add © info
And add your name/text
Save & enjoy :)
-Emo Princess-PTU Tag-
I used Kelly's awesome PTU kit 'Emo Princess' to make this tag.
Fabulous kit!
Check out her blog HERE for all her awesome kits!

Tuesday, November 15, 2011
-Christmas Cutie-

(Click for clear view)
For this tutorial, you’ll need a working knowledge of PSP.
I’m using PSP 9 but any version should work.
This tutorial is my own and any resemblance to any other is purely coincidental.
Supplies for this tutorial:
PSP (any version)
Scrap kit of choice.
I’m using the FTU Kit: An Abominable Christmas
You can get her kits here: http://kittzkreationz.blogspot.com/
Tube of choice: I’m using the wonderful work of Elias Chatzoudis
This is a tube you MUST have a license to use. Don’t use these tubes without a license!
You can find it here: www.psptubesemporium.com
Christmas mask by Faith here: HERE
Let’s Begin:
Open a new canvas-800c600--we’ll crop later.
flood fill white
Copy & paste the wreath from the kit
Select the inside of the wreath w/ your magic wand
Selections
Modify
Expand by 7
Add new raster layer
flood fill w/ a color to go w/ the kit (I used red)
Select none
Move below your wreath.
Copy & paste the close up of your tube
Crop so it fits inside the wreath
Change blend mode to luminance legacy
Copy & paste your full tube over top of your wreath
Add drop shadow
Now we add the elements we want to use.
Use the ones you like..there are TONS in this great kit!
I used the following:
Elf sign
Penguin
Light bubbles
Bells
Red ribbon
Copy & paste each element
Position where you like
Add drop shadow to each
Close off visibility of your white back ground layer
Merge visible
Now copy & paste a paper of your choice from your kit
Move under your merged tag
Apply your mask to this layer
You might have to play w/ it a bit to make it fit how you want.
Once it’s set, merge group
Crop down
Reize
Add © info & your name
Select your mask layer
Adjust
Add noise
Gaussian
35%
Edit
Copy merged
Paste as new animation in AS
Back to PSP
Undo
Add noise
Same settings but change to 45%
Edit
Copy merged
Add after current frame in AS
Back to PSP
Undo
Add noise
Same settings but change to 55%
Edit
copy merged
Paste after current frame in AS
View animation
If you like it, save & Ta-da! You have a new tag!
Thanks for doing my tut!
Monday, November 14, 2011
-Santa's Goodies-FTU

For this tutorial, you’ll need a working knowledge of PSP.
I’m using PSP 9 but any version should work.
This tutorial is my own and any resemblance to any other is purely coincidental.
Supplies for this tutorial:
PSP (any version)
Scrap kit of choice.
I’m using the FTU Kit: Santa’s Goodie Bag by Angel’s Designz.
You can get her kits here: http://angelsdesignz.blogspot.com/
Tube of choice: I’m using the wonderful work of Simon Han
This is a tube you MUST have a license to use. Don’t use these tubes without a license!
I got this tube last year from MPT but you ca now find it HERE
Alien skin: Constellation
Winter image of choice
Let’s Begin:
Open a new canvas-800c600--we’ll crop later.
flood fill white
Copy & paste the frame you want to use as a new layer
Select the inside with your magic wand
Selections
Modify
Expand by 3
Add new layer
flood fill w/ color of choice
DO NOT DESELECT
Move below your fram
Copy your winter image
Paste as new layer
Selections
Invert
Delete
Select none
Change the blend mode of your winter image to luminance legacy.
Copy and paste your tube above all other layers
Add drop shadow
Select the elements you want to use
Paste and position how you like them
Add drop shadow
I used:
candy cane
Flower
Holly w/ ribbon
Stars
Merge visible
Crop and resize
Add you © info
Add your name
To animate:
Select the parts of your tag you want glittery
Adjust
Add noise
45
Apply your constellation effect
But your twinkle amount-100
Overdrive-100
Star density-3
Edge-8
Varition-50
Size-1.98
Apply
Select none
Copy merged
Paste as new animation in AS
Back to PSP
UNDO your constellation & noise
Keep selected
Apply noise 50
Apply constellation-random seed
Select none
Copy merged
Paste after current frame in AS
Back to PSP
UNDO both again
Apply noise-60
Apply constellation-random seed
Select none
Copy merged
Paste after current frame in AS
View your animation
If you like it
Save!
Thanks for trying this tut!
Tut results!
Some designer friends of mine made these BEAUTIFUL tags using my Falling Leaves tut!
Thanks so much Sherena & Shawna for these gorgeous tags & for doing my tut!! :)


Thursday, November 10, 2011
Pink Hottie-PTU
I made this tag using Kellys awesome new kit
"Positively Pink"
It's a great BCA kit! Be sure to check it out by visiting her HERE.
Thanks Kelly!

Winter Fun-Freebie Kit!
My online bestie & I have come together to bring you this little winter collab!!
A lot of my elements I created myself from scratch so I hope you enjoy them!!
Click the preview to download my part.

Check out Natalie HERE to get her part!
(She will have hers posted later this evening.)
Wednesday, November 9, 2011
-Purple Christmas-PTU

(click to view clear © info)
For this tutorial, you’ll need a working knowledge of PSP.
I’m using PSP 9 but any version should work.
This tutorial is my own and any resemblance to any other is purely coincidental.
Supplies for this tutorial:
PSP (any version)
Scrap kit of choice.
I’m using the PTU kit: All Wrapped Up By Jens Sweet Temptations
Be sure to check out her blog: http://jenssweettemptations.blogspot.com/
Tube of choice: Gorjuss girls can be found here: http://www.gorjussarthome.com/store/
Mask 018 here: http://sasluvscrap.blogspot.com/search/label/Masks
Let’s begin:
Open a new work space-800x600-we’ll crop later.
Use your rectangle tool to draw out a square.
Width 23, foreground: white, background: null
Promote layer
Tilt it.
Select the inside of your frame (square) w/ your magic wand
Selections
Modify
Selections borders set at 2 Inside border
flood fill with a color to match your kit or tube.
Select none
Now select inside the frame again w/ your magic wand
Selections
Modify
Expand by 4
Copy and paste a paper from your kit
Selections
Invert
Delete
Select none
Move below frame.
Copy & paste your tube over top of the frame
Erase any parts hanging out
Now you can copy & paste the elements you want to use in your tag
Resize the ones that need it
Position
Add drop shadow to each element you add.
I used:
Bell
Christmas tree
Presents
Little deer
Make this tag your own by using the elements you like best!
Merge visible
Add new layer
flood fill w/ color of choice
I used purple
Apply your mask
Merge group
Move below your tag
Merge visible
Crop down
Resize
Add © add your name/text
Save & enjoy!
Sunday, October 30, 2011
Raven-PTU

For this tutorial, you’ll need a working knowledge of PSP.
I’m using PSP 9 but any version should work.
This tutorial is my own and any resemblance to any other is purely coincidental.
Supplies for this tutorial:
PSP (any version)
Scrap kit of choice.
I’m using the PTU kit: Raven
You can find it here: www.pinkprincessscraps.blogspot.com
Tube/Image-I used Keith Garvey
You MUST have a license to use these tubes! Do NOT use w/o a license!
Find them here: http://psptubesemporium.com/
Mask 10 here: HERE
Open new image 800*600
Open a frame of choice from your kit
Resize if needed
Copy and paste as new layer in your canvas
Copy and paste your tube
Add drop shadow
Duplicate your frame
Move the copy over top of your tube
Erase the parts covering your tube where it shouldn’t
Erase any parts of your tube hanging out under the frame
Select the bottom frame
Use your magic wand & select the inside of your frame
Selections
Modify
Expand by 4
Copy a paper from your kit
Paste as new layer
Selections
Invert
Delete
Select none
Move below your bottom frame layer
Add drop shadow to you bottom frame
Now you can add the elements you want included in your tag
Resize each one if needed
Copy, paste, & place as desired.
Add drop shadow to each one you add.
Use your imagination & make this tag your own!
I used the following:
Black wings
Moon
Cloud
Tree
Black netting
Butterfly
Lantern
Ribbon
Black leaves
Flower cluster
Now copy another paper from your kit
Paste as new layer under all other layers
Apply your mask to this paper
Merge visible
Crop down using your rectangular selection tool
Resize
Add your © info and your name/text
Save and enjoy your new tag!
Sunday, October 23, 2011
-Sweet Witch-PTU

For this tutorial, you’ll need a working knowledge of PSP.
I’m using PSP 9 but any version should work.
This tutorial is my own and any resemblance to any other is purely coincidental.
Supplies for this tutorial:
PSP (any version)
Scrap kit of choice.
I’m using the PTU kit: chills & Thrills By Jens Sweet Temptations
Be sure to check out her blog: http://jenssweettemptations.blogspot.com/
Tube of choice: This cutie is included in the kit.
Let’s begin:
Open a new work space-800x600-we’ll crop later.
Open the double frame element
Copy and paste as new layer
Flip it on its side
Select inside of both circles with your magic wand
Selections
Modify
Expand by 3
Add new rater layer
Flood fill with a color to match your kit.
Move below your frame.
Effects
Texture effects
Weave
Gap size: 1
Width: 4
Opacity: 3
Both weave & gap color: black
Fill gaps: checked
Copy and paste your tube of choice on top of frame layer
Add drop shadow to your tube and frame layers
Now select all other elements you want to include in your tag
I used:
Tree
Black glitter
Pink owl
Leaf glitter
Copy
Paste
& arrange each element as you see fit in your tag
Add drop shadow to each one you add
Crop down w/ your selection tool
Resize
Add text & © info
Save & enjoy your tag
Saturday, October 22, 2011
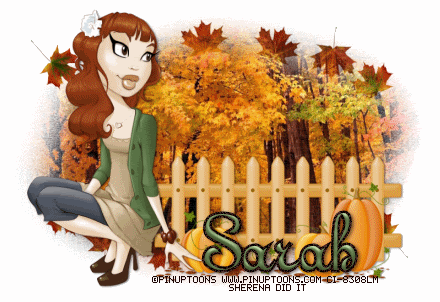
-Autumn Friends-PTU

For this tutorial, you’ll need a working knowledge of PSP.
I’m using PSP 9 but any version should work.
This tutorial is my own and any resemblance to any other is purely coincidental.
Supplies for this tutorial:
PSP (any version)
Scrap kit of choice.
I’m using the PTU kit: Autumn Friends
You can find it here: www.pinkprincessscraps.blogspot.com
Tube/Image-I used this beauty from Zindy
You MUST have a license to use these tubes! Do NOT use w/o a license!
Find them here: HERE
Mask leafy mask here: HERE
Open new image 800*600
Copy a frame from the kit
Paste as new layer
Use your magic wand to click inside of your frame
Add new raster layer
Selections
Modify
Expand by 4
Flood fill w/ a color to match your kit
Select none
Move this below your frame layer
Copy a tree from your kit
Paste as new layer
Move to the side of the frame
Erase any parts hanging beyond the frame
Duplicate
Mirror
Copy the fence from the kit
Paste as new layer
Now copy any other elements you want to use in your tag
I used:
Leaf
Pumpkin
Leaf bundle
Ground
Copy
Resize
And position as you like in your tag
Make it your own!
Copy and paste your tube
Add drop shadow
Add drop shadows to each element you add as well.
Copy a paper from your kit
Paste at the bottom of all other layers
Apply your mask
Merge visible
Crop
Resize
Add © and any text
save
-PTU Tag-
I made this tag using Kelly's awesome kit called
SPOOKTACULAR.
It's an awesome kit for all those Halloween tags!
Check her out HERE

Friday, October 14, 2011
-Witchy Cutie-PTU

For this tutorial, you’ll need a working knowledge of PSP.
I’m using PSP 9 but any version should work.
This tutorial is my own and any resemblance to any other is purely coincidental.
Supplies for this tutorial:
PSP (any version)
Scrap kit of choice.
I’m using the PTU kit: The Witches Brew by Angel’s Designz.
You can get her kits here: http://angelsdesignz.blogspot.com/
Tube of choice: I’m using VeryMany
This is a tube you MUST have a license to use. Don’t use these tubes without a license!
You can find these tubes here: www.picsfordesign.com
Template 104 here: www.amyleahsgimptastictuts.blogspot.com
Open your template
Delete the © layer
Select one f the shapes of your template w/ your magic wand
Selections
Modify
Expand by 2
Copy a paper from your kit
Paste as new layer
Selections
Invert
Delete
Select none
Now do those same steps for the other shapes in your template
Fill each w/ a different paper from your kit
Add drop shadow to each layer
Add your tube
Crop how you see fit & whatever works w/ your tag.
Remember, you can always make this tag your own!!
On your big rectangle, you want to add the close up of our tube
Crop it so it fits
Change the blend mode to luminance legacy.
Now you can mirror the tube copy it again
Paste as new layer
crop it as well & change its blend mode.
Now you can add whatever elements from your kit that you want!
I used the following:
Moon
Bats
Glitter splatter
Cat
Broom
Couldron
Orange & black doodle
& the sparkles
Resize, copy & paste each element as you like.
Add drop shadow to each one
Crop down your tag
Merge visible
Resize
Add your © info
Name and any other text you want on your tag
Save & enjoy
Thursday, October 13, 2011
FTU Tag

-The magic f Fall-PTU

For this tutorial, you’ll need a working knowledge of PSP.
I’m using PSP 9 but any version should work.
This tutorial is my own and any resemblance to any other is purely coincidental.
Supplies for this tutorial:
PSP (any version)
Scrap kit of choice.
I’m using the PTU kit: Autumn Magic By Jens Sweet Temptations
Be sure to check out her blog: http://jenssweettemptations.blogspot.com/
Tube of choice: TooshToosh: www.tooshtoosh.com
Template 105: http://amyleahsgimptastictuts.blogspot.com/
Let’s begin:
Open your template
Delete the © layer
Select one of your shapes of your template w/ your magic wand
Selections
modify expand by two
Copy a paper from your kit
Paste as new layer
Selections
Invert
Delete
Select none
Do these same steps for the other shapes in your template
Add drop shadow to each layer
Now we add our tube
Add drop shadow
Now select all the elements you want to use.
Copy each & paste as new layer.
Add drop shadow to each one.
I used:
Leaves
Fence
Branch of leave
Corn
Bow
Cluster of elements (bear, pumpkins, birdhouse, bird)
I duplicated & mirrored most of my elements.
Once you have them all,
Crop your tag down
Resize
Add name/text & © info
Save & enjoy!
Another Award!!
Man, I am really feelin' the love!! LOL
Thank you to Scrappin Krazy Designs for sharing this award w/ me!

I would like to pass it to these fabulous ladies:
Wednesday, October 12, 2011
-Super Star-PTU

For this tutorial, you’ll need a working knowledge of PSP.
I’m using PSP 9 but any version should work.
This tutorial is my own and any resemblance to any other is purely coincidental.
Supplies for this tutorial:
PSP (any version)
Scrap kit of choice.
I’m using the PTU kit: Star Crazed
You can get her kits here: http://angelsdesignz.blogspot.com/
Tube of choice: I’m using Jose Cano
This is a tube you MUST have a license to use. Don’t use these tubes without a license!
You can find these tubes here: www.psptubesemporium.com
Open a new canvas 800x600
Open the striped circle frame
Copy
Paste as new later
Copy a paper from the kit
Select the inside of the frame w/ your magic wand
Selections
Modify
Expand by4
Paste paper as new layers
Selections
Invert
Delete
Select none
Move paper below frame
Copy and paste your close up of your tube over top the frame
Duplicate your frame
Move it over your tube
Use your eraser to erase parts of the frame covering your tube.
Select you tube layer and erase any parts hanging out beyond the frame.
Add drop shadow to your BOTTOM frame layer.
Copy the striped frame circle again
Resize it by about 75%
Paste as new layer & move under all you other layers.
Position it to the left of your main frame.
Duplicate
Mirror
Now fill both of these little frames w/ a paper just like you did the big frame.
Copy and paste your tube’s close up overtop of the paper in the little frames.
Crop your tube so nothing is hanging out
Change the blend mode to your tube to LUMINANCE LEGACY or any one you choose.
Add drop shadow to each of your smaller frames.
Now select any elements you want to include in your tag.
I used the following:
Blue stars
Paint splatter
Yellow flower
Black and blue ribbon
Feather fan
Star sucker
Wire mesh
Sparkles.
Copy each element
Place each where you want them.
I duplicated and mirrored several of the elements I added.
Add drop shadow to each one.
Crop your tag down.
Resize
Add your name/text and your © info.
Save and enjoy your new tag
Tuesday, October 11, 2011
..A note to my awesome followers & visitors..
Hey guys! Just wanted to let you all I'm still around.
I haven't posted many tuts, templates or kits in a while due to a lot of family issues going on.
Thank you all for continuing to support my blog!!
Much love to all those who visit!!

Sunday, October 9, 2011
New Award!!

-Kiss off Cancer!-
I made this tag w/ Vicki's AWESOME kit called
"Angel of Hope".
It is a BEAUTIFUL kit. Be sure to look HERE to find it!
Thanks Vicki!

Subscribe to:
Comments
(
Atom
)


